Tuesday, October 21, 2008

Re-Purposing Clothing for My Daughter

My daughter needed some new clothes. So, I went "shopping" through our outgrown clothes. I used a navy blue t-shirt and a turtleneck to make one new shirt for her. I cut the sleeves, the turtleneck and part of the bottom of the floral shirt. Then I stitched those pieces to the blue t-shirt to give it the layered look. I was able to make a lettuce edging using only my sewing machine. I set it to make a narrow zigzag and I pulled the fabric as I stitched. So, out of 2 outgrown shirts I was able to make 1 new shirt that my daughter really likes.

Before

After


My daughter has a very narrow waist and doesn't like to wear belts. So, she mostly wears elastic waist pants. That means she doesn't have jeans to wear. So, I took a pair of jeans I got right after I had the baby, and I made a pair of jeans for my daughter out of them. I laid out the pattern so that I would be able to use the existing jeans' hem. They went together easily and fit her well. This was a fun project.


Share/Bookmark

A Few Recipes to Share

Below are a few recipes I wanted to share.

Marinated Cucumbers


4 Cucumbers (Peeled & Sliced)
1Cup Vinegar
1 Cup Water
1 Cup Sugar
1 Tbsp. Salt

Mix last 4 ingredients in a bowl and pour over cucumbers. Chill or enjoy right away.

I found this recipe somewhere on the internet. I made this several times this summer because we had such a bountiful harvest of cucumbers.


Strawberry Pretzel Salad


1 ½ c. Crushed Pretzels
4 ½ Tbsp. Sugar
¾ c. Melted Butter
8 oz. Softened Cream Cheese
¾ c. Sugar
9 oz. Cool Whip
1 Large Box Strawberry Jello
2 c. Boiling Water
1 pkg. Strawberries (Sliced)

Mix first 3 ingredients and spread in a 9” x 13” dish. Bake 10 minutes at 350 degrees. Allow to cool. Next mix cream cheese, sugar, and Cool Whip. Spread over pretzel crust. Prepare Jello with boiling water. Add strawberries and pour onto cream cheese layer. Refrigerate.

This recipe came from my mom. It really tastes good!
Share/Bookmark

Tuesday, October 14, 2008

Mexican Wedding Cakes


This recipe came from a good friend. I have always enjoyed eating these cookies, but made them for the first time recently.

1 c. Softened Butter
½ c. Powdered Sugar
1 tsp. Vanilla
¼ tsp. Salt
2 c. Flour

Cream butter, powdered sugar, vanilla and salt. Stir in flour. Chill 30 minutes. Shape into 1 inch balls. Bake on cookie sheets in a 350 degree preheated oven for 12 to 15 minutes. Roll cookies in powdered sugar while cookies are still warm. Two coats of powdered sugar work best. Chopped nuts can also be added to the cookie mixture if desired.
Share/Bookmark

Apple Goodie


This recipe is a family favorite. It came from my great great aunt on my dad's side of the family.

1 Quart Chopped Apples
1 c. Sugar
1 tsp. Vanilla
1 tsp. Cinnamon
1 c. Quick Oats
1 c. Flour
1 c. Brown Sugar
¼ tsp. Baking Soda
¼ tsp. Baking Powder
½ c. Shortening

Mix apples, sugar, vanilla and cinnamon together and put into a baking dish. Stir remaining ingredients together in a bowl and put on top of the apple mixture. Bake for 30 minutes in a 350 degree preheated oven.
Share/Bookmark

Ring Sling

I first want to say that I really had wanted to blog more frequently. However, sometimes things happen that you don't expect. My husband had to have outpatient surgery last week and it has been an interesting week. He is doing better, but my routine has been off with him being home.


Anyway, I wanted to share a recent sewing project I made for a gal at church. I made the ring sling above loosely using the Maya Wrap instructions found here. I used 3 different shades of coordinating fabric and I was happy with the results. After a hands on demonstration I hope she has had success wearing her baby. I am afraid that after six years of being home with my children that my teaching skills are a little rusty. This site has some great videos to watch about babywearing in a ring sling and in a pouch sling.
Share/Bookmark

Friday, October 3, 2008

Hand Prints on the Wall


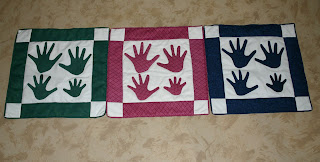
I wanted to make something special for my parents and in-laws for Christmas this year. I decided that a wall hanging with my children's hand prints on it was just the thing. I had seen this blog which inspired me.

First, I traced my children's hand prints onto paper and cut them out. Then, I fused Heat & Bond to the back of some fabric. I then traced the hand prints onto the back of the fabric and cut them out. If you want to be able to stitch around the hand prints then use some other fusible interfacing.

I used a plain muslin fabric to cut one 12 1/2" square. Out of the same fabric I cut four 3" squares. I cut four strips that were 12 1/2" x 3" from the same fabric I used to cut the hand prints from (minus the Heat & Bond). I stitched the pieces together, and then fused the hand prints to the center.

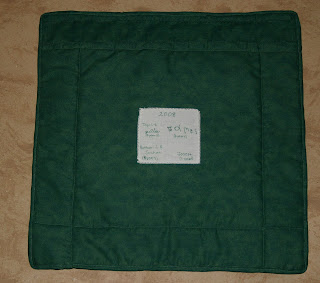
Next, I sandwiched a layer of batting in between my the wall hanging top and a piece of larger fabric that would become the back of the quilt (I used the same fabric as the hand prints.) I then stitched in the ditch along all seams of the quilt top. Once I was finished I squared up the edges so that I could apply my binding. I decided to make my own and made it 1/4" double folded. I first stitched it to the front and then wrapped it around the back and stitched in the ditch. Here is a tutorial that is good.

To personalize the wall hanging I made a square of the muslin and applied Heat & Bond to it. I had the older kids sign their names (I signed for the younger ones) and made a little chart out of it to show whose hand was whose. I also put the age each child will be at Christmas. I made a pocket and hand stitched it to the top of the back. A 1/4" dowel rod will be placed through the pocket. I will cut ribbon and attach it to the dowel with wooden end caps. Then the wall hanging can be hung from a nail.


I hope the grandparents like this gift. It really only cost me maybe $3 for dowel rods and end caps plus my time. I had been given a huge sack of fabric from my husband's aunt recently, and she gave me the Heat & Bond and some batting. I made one for myself and already have it hanging up. I had debated about whether to put the kids names on the front, but opted to leave it plain. It was a fun project and should have a lot of meaning during a season where the meaning is often lost on commercialism.
Share/Bookmark

Wednesday, October 1, 2008

Crocheted Hats


I crocheted these hats as gifts using this pattern. I used the last of the yarn from the ski masks I made that are shown in an older post. The hats went together quickly. I did add an extra row before doing the post rows. I honestly can't remember if I used a smaller hook for the camo hat. I must have since it was for my son. That's what I get for not posting when I actually made these. :-) My oldest son was the recipient of the camouflage hat, and the purple hat was given to a member of a board I'm on as part of a trade. I think both liked the hats. That makes any effort on my part worthwhile.
Share/Bookmark

Long Time No Post

It has been over a month since I last posted. I don't know if I officially decided to take a break, but that is what happened. I am not sure that anyone even reads this blog, but it makes me feel better to think that there is. That way I am not just talking to myself. :-) Anyway, I am going to try to post every day this month (weekends may be an exception, but Monday through Friday I shall try.) So, get ready for lots of recipes, sewing projects, crocheted items, and more.
Share/Bookmark