I have yet another tutorial for you today. This one is for a zippered pouch with a wrist strap. If you remember a few days ago I shared a felt zippered pouch tutorial with you and basically stated that I was up for trying to sew with zippers again. Well, I guess I didn’t wait very long, did I?
This idea was born due to a Christmas gift my oldest four children will be receiving from my in-laws, a Nintendo DS Lite. My husband and I decided to get them each a (used) game and a carrying case.
Cases aren’t that expensive, but I decided to make them myself. I had seen a few tutorials on Pinterest for carrying cases, but decided that they were a little too fussy for my younger two boys. They really just need something to keep a game or two and the DS relatively safe. So, I came up with my own idea and here we are.
The way I have sewn the zipper in this tutorial is possibly not the “correct” way, but it got the job done and was actually fairly easy. I love it when a vision I have in my head actually works out in real life. 🙂

I really hope that the boys won’t think they are girly. Camouflage and Thomas fabric should help then seem more masculine. I also hope that they game systems fit. I checked the dimensions online, but won’t know until Christmas if they actually work. If not, the kids can put other things in them.

To make a small zippered wristlet (I have a terrible time coming up with names for these projects. It takes me back to my high school yearbook editor days when I had to come up with captions.) you will need the following items:
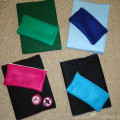
Cotton Fabric (Outer)
Fleece Fabric (Lining)
7 inch Zipper
Scissors
Ruler
Rotary Cutter
Thread
Sewing Machine
Serger (Optional)
Begin by cutting two pieces of fleece that are 5 inches by 9 inches.
Out of the cotton outer fabric cut the following pieces:
Two-5 inch by 9 inch pieces (body)
Two-1 inch by 2 inch pieces (zipper)
Two-2 inch by 9 inch pieces (zipper)
One-3 inch by 11 inch piece (strap)

Open the zipper a little and pin the 1″ x 2″ pieces to either short end of the zipper, right side down. Make sure to line the fabric up with the edge of the zipper. The rest of the fabric will be covering your zipper. Stitch using a 3/4 inch seam.

Press the fabric outward so that the right side is showing. The picture above shows what your zipper should now look like.

Pin one of the 2″ x 9″ pieces of fabric to one long side of the zipper, right side down. You will attach the 2″ x 9″ piece of fabric to both small pieces of fabric (from the step above) and the zipper. Stitch using a 1/4 inch seam allowance (The zipper should be to your left.). Stop and open your zipper past your presser foot when you get close to the zipper pull.
Flip the zipper so that the other long side is at the top and repeat the process.

This is what your zipper should look like now that all four pieces have been sewn to it.

Topstitch along the zipper by placing the left edge of your presser foot along the fabric. You want the zipper to be to the left of the presser foot. Stitch along both sides in this manner.
If you notice, I never said you had to use a zipper foot. You just sewed a zipper using your regular presser foot. See, I told you this might not be “correct”, but it works. Just remember to stop sewing any time your presser foot is close to the zipper pull. Leave your needle in the fabric. Lift your presser foot. Move the zipper pull out of the way, and then resume sewing.
Set the zipper aside while you work on the rest of the bag.

Sew or serge the fleece and outer 5″ x 9″ pieces of fabric, wrong sides together, along the two short sides and the long bottom side. I used my serger because I finally have one. 🙂 However, if you use a sewing machine, use a 1/4 inch seam allowance and then overcast your edges on the 3 sides.

Next, take your zipper piece and pin the fleece/cotton pieces to it, right sides together. Sew each side using a 1/4 inch seam and then overcast (or serge each seam).
The picture above shows the wrong side after the pieces have been sewn together.

Here is what the right side looks like now. Set the whole thing aside for a minute while you make the strap.

Using your iron, press the 3″ x 11″ piece of fabric in half, wrong sides together. Unfold and press both raw edges toward the center fold line. Fold the entire thing in half and press.

Stitch the strap fabric closed using a 1/8 inch seam allowance.

Fold the strap in half and pin the short, unfinished edges to the zipper fabric, not the fleece/outer fabric. Fold the bag so that the strap is inside and the bottom edges meet. The zipper should be at the top. Stitch the strap in place a couple of times to make sure it is secure. Right sides should be together.
Make sure the zipper is halfway open and then stitch using a 1/4 inch seam allowance. Start at the top where the zipper is and then sew along three sides stopping at the top on the other side. Do not sew the side that has the zipper or your bag won’t open.
I did a possibly unnecessary step by serging (without cutting) around the three sides after I stitched it together with my sewing machine. I just wanted to make it sturdy because I know my boys.

This is what your bag should look like when you are finished sewing. Be sure to finish off your serged ends if you used a serger.
Turn the bag right side out and push your corners out. Press.

This is what your bag should look like if you followed my instructions (assuming I wrote everything correctly).

Here’s a close-up of the zipper. I’m feeling pretty good about figuring it out. I love it when a plan comes together. 🙂 I will try to remember to update this post after Christmas with a picture of a DS inside.

Disclosure: This post contains an affiliate link to Amazon. If you choose to purchase something from that site, I would get a percentage of the sale. Thanks for supporting this site.

Pingback: Zippered Wristlet: Homemade Christmas Gifts()