If you saw my post last week about the doll bunk bed I fixed up for Janna for Christmas it should come as no surprise that she is getting a doll for Christmas as well. 🙂
I thought it might be nice to make a couple of skirts for Janna’s doll (affiliate link) and the one I am getting for my niece. I also wanted to make a blanket for my niece’s doll.
Simple and reversible were the ideas that popped into my head, so that is exactly what I came up with.

I do want to note that the doll pictured above is one my mom made when Janna was a baby. I didn’t want to take Janna’s new doll out of the box. 🙂
I ended up making four skirts using scrap fabrics from the aprons I made for the girls last Christmas and the dresses I made this spring.
If you want to make a reversible skirt for a 14 inch doll, or any doll for that matter, here is how I did it.
Supplies
- 2 Cotton Fabrics
- 3/8 inch Elastic
- Thread
- Pins
- Scissors
- Ruler
- Iron
- Sewing Machine
- Safety Pin

Instructions
1. Cut two pieces of fabric that are 5 inches by 18 inches.
If you make a skirt for a different sized doll you may need to adjust these measurements.

2. Fold each piece of fabric so the short ends are together (right sides together) and stitch along the short ends using a 1/4 inch seam allowance.
You should now have two tubes of fabric.
3. Place one tube of fabric inside the other tube so that right sides are together and the seams are lined up.

4. Sew around the bottom/hem of your skirt (keep this in mind if your fabric pattern is directional) using a 1/4 inch seam allowance.

If you followed the first four steps correctly the picture above is what your fabric should look like when you turn the fabrics right-side-out.

5. Fold the top of each skirt (the ends you didn’t sew in step 4) under 1 inch, with wrong sides together, and press.
This will become the casing for the elastic.

6. Fold the fabric tubes so that the wrong sides are together.

7. Press the hem.

8. Topstitch around the entire hem of the skirt using a 1/8 inch seam allowance.

Now it is time to sew the casing you created in step 5.
9. Sew along the folded edge using a 1/8 inch seam allowance. Leave 2 inches un-sewn.
10. Sew another seam just to the left of the seam in step 9 using a 5/8 inch seam. Leave 2 inches un-sewn.

11. Measure your doll’s waist and cut a piece of 3/8 inch elastic the same length.
My piece of elastic was 11 inches long.
12. Insert a safety pin into one end of the elastic and use it to guide the elastic through the casing (the opening you created by sewing the seams in steps 9 and 10).

13. When you have the elastic in the casing you should have two ends in the opening. Sew them together with a zig-zag stitch. Go back and forth over the same area a few times to secure the elastic.

14. Stitch the opening in the casing closed using a 1/8 inch and 5/8 inch seam allowance, matching up with the seams you stitched in steps 9 and 10.
15. Even out the gathers in the skirt and call it done.

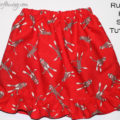
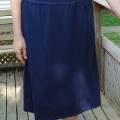
Here are the four skirts I made. Thanks to making the skirts reversible it is like I made 8 skirts.

This picture shows the same skirts as in the previous picture. Pretty cool, huh? 🙂
Now, if you want to make a super simple blanket for a doll, here’s what you will need to do.

I cut two pieces of fabric at 16 x 19 inches because I didn’t have any bigger pieces. You could make your blanket whatever size you want.

Then I placed the pieces of fabric so that the right sides were together. I used a 1/4 inch seam allowance and sewed around all 4 sides, with the exception of about 3 inches.
Next, I clipped the corners and turned the fabric right-side-out through the opening and gave it a good pressing.

The last thing I did was topstitch around the whole blanket using a decorative stitch.
Because the blanket I made was small I opted not to do any quilting.

This was a fun project and it will hopefully be easy for the girls (who are only 2 1/2) to change the doll’s clothes themselves.
Let last doll-related thing I want to do is make a simple T-shirt. If I can’t find a pattern I may have to wing that, too. 🙂
Do you enjoy sewing doll clothes?