Yesterday I shared a tutorial for a no-sew embroidery hoop wall pocket. As promised, I am going to share another tutorial with you today. This is another accessory for my daughter’s sewing area. I had a hard time coming up with a name, but have decided on “Pocket Placemat for a Sewing Machine”. I am not sure if that is an accurate title or even if it makes sense. If you have any suggestions I am open to changing the name.
My aunt made me one of these, but the whole thing had bias tape around it and I am not that in love with using bias tape on corners. Plus, the fabric she chose didn’t really go with my sewing room decor. So, I decided to make a new one and write up a tutorial as I went.
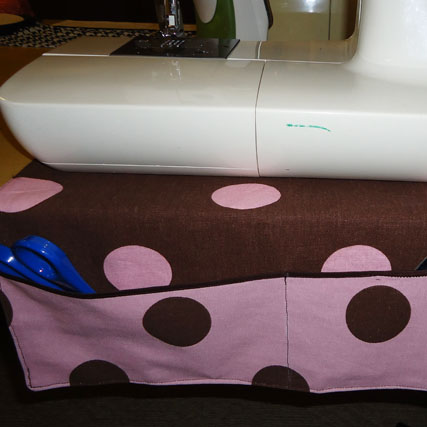
Here is a picture of the pocket placemat in action. Part of the placemat goes under a sewing machine and the other part hangs over the edge of a table and can hold sewing items like scissors, a seam ripper, and a seam gauge. That way some of your most used items will be handy in a decorative way.
If you would like to make one of these here are the supplies you will need.
2- 18 inch x 15 inch pieces of fabric (I used a cotton duck fabric for this tutorial.)
1- 18 inch x 5 inch piece of fabric for pocket (or an 18 inch x 10 inch piece if choosing option 2)
1- 18 inch piece of double fold bias tape 1/4 inch or 1/2 inch in width
Sewing Machine
Thread
Scissors
Ruler
Rotary Cutter
First, Iron all of your pieces of fabric once you have them cut to the appropriate size.
Next, sew the piece of bias tape to one 18 inch side of the 18 inch x 5 inch piece of fabric.
I guess I didn’t take as many pictures of this process as I thought. Anyway, here are the steps to take to get to the point where your placemat will look like the picture above.
The next thing you need to do is draw chalk lines (or use a water soluble pen) and mark two lines on the 18 inch x 5 inch piece of fabric. I made my lines in the middle at 9 inches and another at 4 1/2 inches from one side. You could make all of the pockets the same size or make more pockets, it is up to you.
Now, baste (a long stitch) the pocket on the 2 short sides and along the bottom to one of the 18 inch x 15 inch pieces of fabric, wrong sides together, using a 1/4 inch seam allowance and being sure to line the pieces up evenly along the bottom.
Then, stitch along your chalk lines being sure to backstitch at the top.
Lay the other 18 inch x 15 inch piece of fabric on top, right sides together, and pin in place. Use a 1/2 inch seam allowance and leave a 4 inch opening along one side for turning. Trim the seams to eliminate bulkiness.
Turn the placemat right side out and press. Topstitch around the whole thing using an 1/8 inch seam, and you’re done!
Did I totally confuse you? Is there anything that needs clarification? It really is a pretty simple project that is decorative and functional.
In the materials list I mentioned a second option for the pocket. If you don’t want to use bias tape, you can always cut the pocket piece to a measurement of 18 inches x 10 inches and fold it in half. Then follow the directions above.
This pocket placemat is actually for me. It coordinates with other items in my sewing room. The yellow floral is a home decor fabric and the green is just regular cotton fabric.
If you have any questions or a name suggestion leave me a comment. Have a great afternoon!


