Last Summer Joseph needed some new shorts. He helped me pick out some fabrics and I got to work making several pairs of simple, elastic waist shorts.

I didn’t even bother with a pattern but drafted my own using a pair of shorts that fit him well. Here’s how.
Note: This method will work with pants as well as shorts.
Supplies
- Fabric
- Thread
- Scissors
- Pins
- Elastic (1 Inch Wide)
- Ruler
- A Pair of Shorts That Fit
- Sewing Machine
- Iron
- Paper
- Pen or Pencil

Instructions
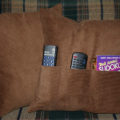
1. Turn the pair of shorts you are using as a template wrong-side-out and then fold them in half (see picture below).
2. Trace around the shorts on a large piece of paper adding in seam allowances.
For example, I added 5/8 of an inch to the left and right of the shorts. I added a little one inch to the bottom and 1 1/2 inches to the top.
Be sure to stretch out the fabric at the waist so the waist of the shorts you make isn’t too tight.
3. Cut out the pattern piece.

4. Place the pattern piece you made in step 2 on top of the fabric. Fold the fabric in half first.
Do this step twice because you will need 4 total pieces.

If you have a serger I recommend using it for most of the sewing as it overcasts and sews together at the same time. If you don’t, then be sure to overcast your edges before stitching the pieces together.
For the purpose of this tutorial I will be saying “serge” but you can definitely use a sewing machine only. That is all I had for many years.

5. Serge two pieces of the shorts together along the longest side. Be sure to keep right sides together. Repeat for the other two pieces.
The picture below shows what you should end up with after step 4.

6. Open the pieces up and serge across the top and bottom, very close to the edge.
You don’t really want to cut any fabric off during this step. You are just trying to prevent the raw edges from raveling.

6. Serge the short side that is just below the curve on both sets of pieces (on the left side of the picture below).

7. Pin the two sections together, right sides together, along the raw curved edges being sure to match the seams.

The pictures above and below both show how to do the pinning for step 7.

8. Serge the two sections together.

9. The Elastic Casing: Fold the top of the shorts under 1 1/2 inches so that wrong sides are facing each other.
10. Press the casing in place.

11. The Hem: Fold the bottom of each section of the shorts under 1 inch so that wrong sides are facing each other.
12. Press the hem in place.

The picture below shows what the shorts/pants should look like after doing steps 9-12.

13. Sew the elastic casing you created in steps 9 & 10 near the serged edge. Leave a 2-3 inch opening for inserting the elastic.
14. (Optional) Fold a piece of grosgrain ribbon in half and sew it into the seam to be used as a tag.

15. Attach a safety pin through one end of the elastic and thread it through the opening you left in step 13.
To know the correct amount of elastic to use the easiest thing to do is try the shorts on before cutting and sewing the ends together.
If you know the waist measurement you can probably get a pretty close fit by cutting the elastic 1 inch shorter than that measurement before threading it through the opening.

16. Once you have cut the elastic to size overlap the ends and sew back and forth multiple times using a zig-zag stitch.

17. Sew the opening closed where you threaded the elastic through in step 15.
18. Adjust the elastic so that the shorts are evenly gathered.
19. “Stitch in the ditch” on all four seam lines at the top of the shorts like in the picture below.
This step helps ensure that the elastic doesn’t get twisted.

20. Hem the shorts by sewing around the bottom of each leg opening. (You created the hem in steps 11 & 12.)
I often sew on the right side of the shorts or pants so that I make sure the hem is even, but you can sew on either side using a 5/8 or 3/4 inch hem.

If all went well you should now have a pair of custom made shorts or pants. Let me know if any steps weren’t clear.

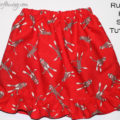
Here’s a pair of shorts I made using some scrap jean material from a skirt Julia made. I added a Thomas appliqué near the hem of one leg.

For my nephew’s birthday I made several pairs of pants for him.
The pants below were made with scraps from a pair of Joseph’s shorts. I even added a little appliqué to a shirt to make a matching set.

The tan pants below were made using a pair of my husband’s old pants. I used the existing hem for the hem of the new pants.
The green pants were made out of two sweatshirt sleeves of my brother’s that were left from making him a sweatshirt quilt a few years ago.

I also made my nephew a pair of flannel pajama pants from some Goodwill fabric and fleece pajama pants from some fabric that was given to me.

Several years ago I was intimidated by the pants making process but since I figured out how really easy it is I have enjoyed making lots of pairs of pants and shorts.