Gifts in a Jar: Taco Seasoning Mix (with Free Printable)

One of our favorite meals to eat is tacos. I have been making my own taco seasoning mix for years which is easy, tasty, and I can control what ingredients I use.

The ready to use packets often contain some less than desirable ingredients. Not only that but with a child who has food allergies it is usually better to make as much as I can myself to limit any allergic reactions.

My mom has been saying that she doesn’t know how I make my own taco seasoning mix, so I decided to remedy that this past Christmas.

Not only did I mix up a batch of taco seasoning mix, but I also made a recipe card and label to go with it.

I have tweaked my recipe over the years and I am pretty happy with it. My recipe makes enough taco mix to fill 2 jelly jars, or a quart jar that is filled to the brim.

If you would like to make some taco seasoning mix as a gift, or just for yourself I am sharing the label and recipe card I created. Simply click the picture or link below to download and print your own copy.

Note: The file is a Word document that you can edit the background and font. To better understand how to do that please watch the video I shared for how to personalized pocket calendars. The process is the same.

Taco Seasoning Mix Recipe Cards & Labels

Please let me know if you have any questions about how to print or edit the labels. Enjoy!

I am linking this post to:

Blogging Binder (with Free Printable)

I am always on a quest for organization in every aspect of my life. While I try to be organized I don’t always achieve my goal.

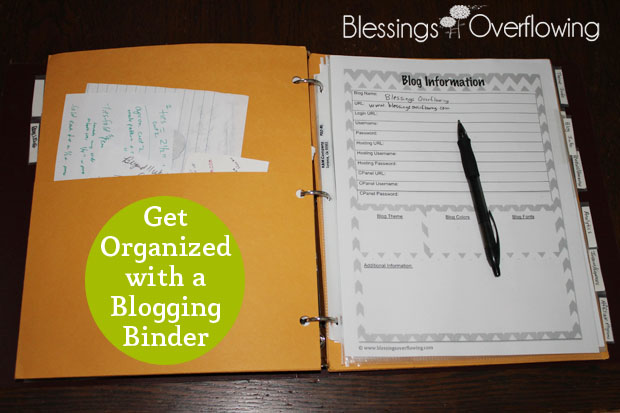
Towards the end of December I decided that I wanted to make a blogging binder to help me get my blogging life in order.

Generally, I fly by the seat of my pants with regards to blogging. However, I have decided that I need to have some plans in place. Plus, having all of my blog information in one place would be super helpful.

So, I started perusing various sites to find if anyone else had ever created a blogging binder. I found lots of different ideas and various printables.

I decided which ones would suit my needs and set to work.

After seeing some of the ideas other bloggers had I thought it would be really nice to have a spiral bound binder. However, the cheap frugal side of me chose to make do with what I had.

So, I found a binder, some plastic page protectors, three-ring folders, and some tabs in my office supply stash so my “new” binder didn’t cost me a thing.

I think having a binder will actually work out better because I will be able to add or take out pages as necessary.

To better show off my new binder I decided to make a video. You can view it below.

As you can see, my binder is very simple and is a work in progress. I am already utilizing it and I have found that I am posting earlier in the day instead of staying up late to write posts. Score one for the binder already. :)

The calendar, review/giveaway page, analytics page, income/expenses page, and affiliate page were all downloaded from Homeschool Creations.

Living Locurto is where I found the weekly blog calendar, and I printed the Blogger’s Prayer from A Holy Experience.

While I didn’t use any of her printables, Infarrantly Creative has a great looking blog planner with free printables.

Also, I created the blog information sheet shown in the video. It is something I have been wanting to make for a while and finally got around to it. You can download and print the file by clicking the picture or link below.

Free Blog Information Sheet

Are you a blogger? How do you stay organized?

I am linking this post to:
 

Personalized Pocket Calendars (with Free Printable)

I wanted to tell you about some frugal gifts I made for my mom, my mother-in-law, and my sister-in-law for Christmas. (I forgot to make one for myself. I always do that.)

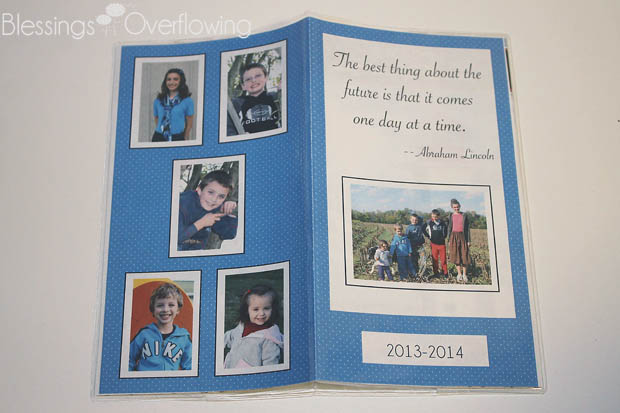
I took inexpensive pocket calendars and made personalized covers for them. It was easy and made for a nice gift.

I designed a different cover for each person. The one pictured above was for my MIL and only features my kids since they are her only grandkids.

This one was for my mom. She has 7 grandkids so I used group shots instead of individual pictures.

This last one was for my SIL and she has two little ones.

Not only am I showing you the finished products, but I am also offering each of the designs I made as free Microsoft Word templates. You can download them by clicking the links below. (When you click on a link it will immediately download to your computer as a .docx file.)

Personalized Pocket Calendar Cover 1

Personalized Pocket Calendar Cover 2

Personalized Pocket Calendar Cover 3

You will be able to change the text, the background, and pictures. I would recommend making sure that your printer settings are set to not scale or resize the document when you go to print.

In addition to sharing the templates, I have created a video to show you how to make the changes. It was my first time to do a screencast. I hope you find it helpful.

(Those of you reading in a reader or via email will need to click over to see the video.)

Since the calendars I purchased were two year calendars I think I will have to make the recipients new covers next Christmas because the kids will have changed a lot in one year. :)

Please let me know if you have any questions.

I am linking this post to Somewhat Simple and Tatertots & Jello Weekend Wrap Party.

Homemade Cookie Dough Gift Set

My mom has a tried and true sugar cookie dough recipe that she has used for many, many years. They are so yummy!

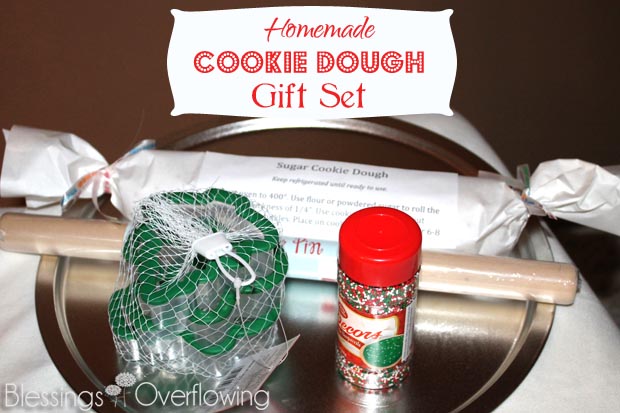
I thought that the dough would be perfect for giving as a gift this year paired with some cookie cutters and sprinkles.

This is a relatively frugal gift and is also great for gift giving when you want to give something homemade but don’t have a lot of time.

Also pictured in this set is a rolling pin and a cookie sheet. You can add all of the things I did or simply give the cookie dough. I am sure the recipients will be thrilled regardless of what extras you put in the gift set.

I made a batch of sugar cookie dough (recipe at the end of this post) and divided the dough into four equal sized balls.

Then, I placed each ball on a large piece of plastic wrap and wrapped it up. Next, I rolled the ball into a log.

At this point I put the dough into a freezer bag and stored it in my freezer until I was ready to give it to the recipients.

When it was time to give the dough away, I wrapped it in a piece of freezer paper and taped it closed. A ribbon tied to each end and a label glued to the front were the finishing touches.

If you want to use the labels I made simply click the link below.

Cookie Dough Labels

Of course, we had to test out the dough. Joseph was very serious about his work and thoroughly enjoyed making cookies.

Janna was a little less sure of what to do and ended up using the small amount of cookie dough I gave her as play dough. :)

We only put colored sugar on the cookies before baking instead of icing them afterwards. I like to either use colored sugar or sprinkles because they make decorating the cookies easier and much less sweet than icing them would.

If you would like my mom’s sugar cookie recipe I have typed it up below. Just be aware that it makes a ton of cookie dough. Like I said earlier, you can divide it into fourths.

Even if you don’t give any of the cookie dough away, I recommend making one batch and freezing the rest in logs for later use.

Mom's Sugar Cookies

Ingredients

  • 1 Cup Shortening
  • 1 Stick Butter (1/2 Cup)
  • 2 Cups Sugar
  • 4 Eggs
  • 2 tsp. Vanilla
  • 4-5 Cups Flour
  • 2 tsp. Baking Powder
  • 2 tsp. Salt
  • Powdered Sugar or Additional Flour
  • Sprinkles or Colored Sugar (Optional)

Instructions

  1. In a large mixing bowl, cream shortening, butter, sugar, eggs, and vanilla.
  2. In a separate bowl, combine 4 cups flour, baking powder, and salt.
  3. Gradually add the flour mixture to the shortening mixture, mixing well before adding more.
  4. Add a little more flour at a time until the dough is no longer sticky but not stiff.
  5. Chill the dough for an hour.
  6. Preheat oven to 400 degrees
  7. Divide the dough into 4 sections and work with one section at a time.
  8. On a floured or powdered sugar surface use a rolling pin to roll the dough to a thickness of 1/4 inch.
  9. Use cookie cutters to cut out shapes.
  10. Place cookies on cookie sheets.
  11. Sprinkle with colored sugar or sprinkles, if desired.
  12. Bake at 400 degrees for 6-8 minutes.
  13. Allow to cool slightly then transfer to wire racks to cool.
  14. Once cooled, eat or decorate with icing if sprinkles or colored sugar weren't used.

Notes

Be careful not to use too much flour when mixing up the dough. If it has too much flour the dough will become too stiff. I recommend using no more than 5 cups. You can always add more when rolling the dough out. Chilling the dough will help it be less sticky as well.

I like to line my cookie sheets with parchment paper because the cookies will slide right off.

Baking the cookies for 6 minutes will yield a very soft cookie while 8 minutes will give you a crunchier, but not too crunchy cookie.

Powdered sugar is a tasty option for rolling out the cookie dough instead of using more flour.

This dough is works great for freezing. Simply put sections of dough on a large piece of plastic wrap and roll into a log. Freeze in a freezer bag until ready to use. Thaw the dough in the refrigerator prior to using. You can even use the log of dough to make slice and bake cookies.

Palm shortening is a healthier option than traditional shortening. You could use all butter if you wanted, but the dough might be slightly different to work with.

http://www.blessingsoverflowing.com/2012/12/homemade-cookie-dough-gift-set/

Week 3: Get “Dressed for Success”

Welcome to week 3 of trying to get our lives and homes more organized. If you are just joining me feel free to just jump right in. So far, we have made habits of reading our Bibles for 15 minutes each day and getting 8 hours of sleep per night.

This week’s goal is another personal goal. Don’t worry, we will get to the homemaking goals soon enough. I just think that getting my life in order will allow me to better get my home in order.

Anyway, this week’s goal is to get “dressed for success” each day. What I mean by this is that I plan to wear something other than stretch pants and an oversized T-shirt. Even on days when no one except my family will see me, I plan to dress in such a way that if I had to leave the house at a moment’s notice I would look decent.

When I made this goal last year I did pretty well with it. Then, when spring rolled around and I was doing yard work I simply quit worrying about what I looked like unless I knew I had somewhere to go. Too often I can be seen looking like this.

Paint splattered stretch pants, an oversized T-shirt which makes me look like I’m pregnant, and unkempt hair have been the norm too often lately.

One day recently I was still in my pajamas when I had a flat tire while taking the kids to school. It’s not a good look to be out on the highway in purple flowered pajamas. If I had been dressed before I left the house, I could have saved myself some embarrassment.

I plan to change that this week.

I need to take my job as full-time mom just as seriously as if I worked outside the home. I need to “dress for success” even when I am only going to be seen by my husband and children. They deserve to see me at my best.

The outfits I will more than likely wear will consist of blue jeans and a nice shirt. Nothing fancy, but I plan to look presentable and even wear an appropriate upper undergarment. :)

While this will be my version of being “dressed for success” this type of outfit may not be what you wear. The point is to wear clothing that you would feel comfortable being seen by anyone while wearing.

Last year I went through my closet and got rid of quite a few clothes that didn’t fit, were totally worn out, and clothes that I didn’t love and thus never wore. While that was a very worthwhile endeavor, I have yet to replenish my closet with items that I do love.

So, I think this week I will seek out a few pieces of clothing that will work for multiple occasions and with other items in my wardrobe. The thrift stores will be my first place to check before I even think about checking retail shops.

In addition to dressing nicely, I plan to take the time to fix my hair because naturally curly bedhead hair is not a good look in spite of my efforts to try to make it a trend. ;)

Are you with me on this one? Do you feel the need to get rid of the frump and start making an effort to “dress for success”?

To help keep track of whether or not we meet our goals this week, I have created a printable checklist. Simply click on the picture below to print your copy.

If I can remember, I will try to post a picture on my Facebook page each day to show you how I am “dressed for success”.

Thought for the week: My job as a mom is important enough to take the time to look nice.