Today is my last homemade Christmas post for this year. If you want to see the entire list then click here. I have to say that I am pleased with the responses my homemade creations received. Scarves and hats have been worn as well as pants and skirts, toys have been played with, and pictures have been hung.

I made two rice heat therapy bags for my son’s teacher and her assistant. I always make an inner bag of cotton fabric which holds the rice. Then I made the outer bag of fleece. I attached a tag with instructions and a poem I wrote.
Your students are sweet,
Of course, this is true.
But sometimes they might,
Cause you a pain or two.
So, if this is the case,
This bag you should heat.
And allow its warmth,
To give you a treat.
By Jackie

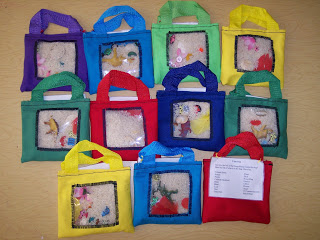
I also made some small fleece rice and flax seed bags for some children (Boo Boo Bags) and friends (Headache Helpers). These bags have a final measurement of 3″ x 8″. They can be heated in the microwave or put in the freezer. I again made an inner bag to hold the rice and flax and then used fleece for the outside.

I spent some time this past fall taking pictures of various items inside and outside of our home to make some name pictures. I had seen some on various sites on the web, but could not justify the cost. So, I made some myself. I am happy with the way they turned out and hope the recipients appreciated them. I would like to make some for my children this year using their first names.

I posted on my preschool blog yesterday all of the details of how this footprint art was made. Check it out.

Our church has a homemade Christmas card exchange, and my older two children and I have participated for the last few years. I drew my brother’s name, so I used a picture I had taken of him and his wife. (No editing was used to make the picture.) I used a piece of wood and applied a black and white copy of the picture using Mod Podge. I used two coats to seal the top and added a piece of yarn through the hole at the top.

My daughter made a Christmas mouse using some instructions we found at Family Fun.

My son made a card and then tied three candy canes together to act as a card holder.

Using the same technique as the ornament I made for my brother I made three ornaments using our family picture. One for us and two for the grandparents.

My brother surprised me with his craftiness by making me this sign. It is made from a thin piece of Styrofoam. He glued letters to the front and then used gray spray paint that had something in it like acetone. (I will have to ask him again.) The paint caused the Styrofoam to shrink, and made the letters look raised. (Once the paper letters were taken off.) At first it looked like stone, but when I picked it up I realized how light it was. Pretty creative brother, huh?

This giant ornament was created by my mom with minimal help from my oldest two children and I. One Sunday after Thanksgiving we blew up some balloons and used watered down glue to apply a few layers of newspaper strips. Once they were dry my mom applied paper mache and let it dry. Then she cut a hole in the middle and spray painted the outside.
We used spray glue to attach aluminum foil to the inside. We attached a single Christmas light to the top along with a wire for hanging and a bow. Some polyester stuffing was used to look like snow and then a figurine we have had for several years completed the large ornament. This project was found in a book my mom has had since the 1970’s. It was fun. Thanks, Mom!
We had a great Christmas and I feel so blessed. Being with family and friends is more important than any of the gifts we received. We are thankful for the presents we got, but we were happy to just be together. Thanks for joining me on this handmade Christmas journey. I have some ideas already in mind for next year. 🙂