Ever since we picked 72 pounds of strawberries nearly two weeks ago we have been enjoying strawberries in a variety of ways, but one of our favorite ways is eating strawberry jam on toast or bagels.
A few years ago I posted a tutorial for making strawberry jam the easy way, using powdered pectin. While this method works well, I wanted to try the old fashioned way of making strawberry jam that only required two ingredients.
Today I am sharing my tutorial for making and canning 2 ingredient strawberry jam.

Here are the steps you will need to follow if you would like to make strawberry jam this way, too.
Supplies
- 2 Quarts of Strawberries
- 6 Cups of Sugar
- Canning Jars
- Canning Lids
- Canning Rings
- Water Bath Canner
- Large Pot
- Small Pan
- Knife
- Canning Funnel
- Jar Lifter
- Paper Towel or Towel
- Water
- Blender or Hand Held Immersion Blender (Optional)
- Candy Thermometer (Optional)
Instructions
1. Rinse and cut the stems off of 2 quarts of strawberries. (There are obviously more than 2 quarts in the picture below.  )
)

2a. (This option is for those who like a traditional jam consistency.) Crush the strawberries with a spoon, fork, potato masher, or other hand tool that will get the job done.
2b. (This option is for those who want a smooth jam that doesn’t have chunks of berries in it at all.) Use a blender or immersion blender to puree the strawberries.
I use option 2b because some of my kids don’t like their jam to be chunky. I use an immersion blender because I can blend a large quantity of berries in a big bowl all at once.

3. Pour the crushed or pureed strawberries into a large pot.
While the strawberries won’t take up much room in a tall pot, the mixture will bubble a lot and you will be glad you chose a large pot to prevent boil overs.

4. Add the 6 cups of sugar to the strawberries and mix well.
I used evaporated can juice as a more natural alternative to white sugar in some of my batches. Please note that it will cause the jam to be darker than if white sugar is used.

5. Bring the strawberry and sugar mixture to a boil. Stir the mixture until the sugar dissolves.
6. Once the jam has come to a rolling boil, continue boiling for 40 minutes.
Notice how high the mixture rises in the pot when it is boiling well. That is why I said to use a big pot.
Also, you won’t be able to walk away from the stove and do something else. Stay close to the kitchen and stir fairly frequently to prevent sticking.

6. Fill your water bath canner with water and bring to a boil while you are cooking the jam.
7. Place the canning jar lids in a small saucepan of water and allow them to simmer while you work on the following steps. Also, wash your jars and place them in a large pot of water and simmer or use water that has already boiled.
8. When 40 minutes has passed you can use a candy thermometer to check the temperature of the jam. If it is 220 degrees it is ready to be canned.
If you don’t have a candy thermometer you can test for the jellying point using a cold spoon. If the jelly breaks from the spoon in a sheet, instead of by drops, the jellying point has been reached.

9. Remove the pot from the stove and spoon off the foam that is on top.
I usually put the foam in a bowl and and eat it when it cools.

10. Remove the jars from water and place upside down on a towel.
11. Take one jar at a time and put the canning funnel on top. Spoon the hot jam into the jars to within 1/4 inch of the top.

12. Wipe off the rims of the jars with a paper towel or cloth towel.

13. Place a canning lid (that has been simmering in a pan of water) on each jar.

14. Tighten a canning ring on top of each jar until you meet resistence. Do not over-tighten the ring.

15. Place the jars into the water bath canner and bring the water to rolling boil.
16. Once the water is boiling well, set a timer for 15 minutes.

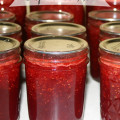
17. When 15 minutes has passed, use a jar lifter to remove the jars from the canner and place them on a towel to cool for at least 24 hours.

I used 8 ounce jelly jars and pint jars to can the jam in. The time for processing was the same for both.
I am going to tell on myself for a minute. Two years ago when I first tried this method of making strawberry jam I decided that I could do a double batch because my pot wasn’t full with a single batch. (Remember what I said in step 3?)
Anyway, the jam boiled so high and started to boil over. I had to scramble to get a lot of the jam out of the pot and into another pot. It was quite a mess and I really don’t recommend doing it.
I took the picture below just before it started to boil over because I was taking pictures to right up this tutorial. I took new pictures when I made this jam last week, but I was glad to have this picture as a warning/reminder to not make a double batch.

While I really like how easy it is to make strawberry jam with powdered pectin, I am glad to be able to make jam this way with just two simple ingredients.
This post contains affiliate links. Thanks for supporting this site.